Thursday, February 23, 2012

Oatmeal Play Clay!

OATMEAL PLAY CLAY is easy to make! All you need is 1/2 cup flour, 1/2 cup water and 1 cup oatmeal.   Combine flour, water and oatmeal. Stir until smooth. If sticky add more flour.  Remove from bowl and knead on floured surface fro 3-4 minutes. Store in an airtight container or ziploc.  Can make different colors by adding 6-8 drops of food coloring. This is the perfect dough for a young child's first sculpting experience!
We got out a few of our playdoh tools to cut and roll out our oatmeal play clay.
We even found a bucket of small animals that found some caves, burrows or icebergs to live in/on! The kids played with this for almost an hour straight!!!!

Thursday, February 9, 2012

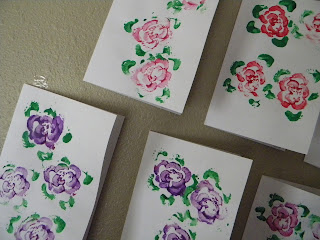
Roses from celery???

Yes! Roses from celery. You know that end you have from cutting all your delicious celery off? Well, here's a great use for it! When painted and pressed out on paper, it looks like a rose! The kids are in the process of making their mom's cards for Valentine's Day...so act surprised if you're seeing this before then:)

Laminated Placemats!

A different way of painting was fun for the kids. They used cotton swabs:) They painted their heart however they wanted to. We let them dry, cut them out and glued them to construction paper. We have to add a few stickers to the sides yet and stop at the library to get laminated! They will be ready just in time for use on Tuesday for Valentines Day!

Shaving cream and cars!!!!

OH BOY! Down and dirty they think:) But actually a clean activity to do! Just spray shaving cream piles in front of each child, have them pick out a a couple matchbox cars or other toys and watch their imaginations go wild! Made for a very clean table afterwards:)

Our Valentine's for the birds!

I love making things to hang outdoors for the wildlife! Wish we had a daycare in the country!These were super easy to make!  Cut out your choice of shape, spread egg on bread, press in bird seed. Let dry for a good day and then make a small hole. String some yard through the hole making it long enough to hang from a tree branch or a yard stake. Try catching a sneek at the birds enjoying a winter treat.

Our Reindeer Snowman:)

Our lovely reindeer snowman. He looks happy that he finally got built this year and yes, he melted the next day:) BUT, we had tons of fun making him with the packable snow!

Winter Crafts

Snowmen and snowladies:) With 2 different size circles and bits of construction paper we made some cute snowmen looking up at the snow falling from above.  We used construction paper, glue, and sticky snow flakes! They turned out super cute! Thanks Pinterest!

Thursday, January 19, 2012

Reindeer with feet and hands!

We used our hands and feet to make these friendly reindeer. Added a red nose with fingerprint and some googly-eyes.

A spoonful of sugar helps anything:)

The kids had fun dipping their spoons and decorating them with sprinkles of all kinds! We used heavy plastic spoons, white almond bark, sprinkles, chocolate chips and M&M's. Nothing like sending them home with sugar on a stick:)

Spending some quality time inside shirtless and outside on these wonderful winter days!

All my happy smiles at 8 am:)

Camels with handprints! Wisemen riding (finger prints)

Trees with hands and feet!

Such precise painting and placement of shapes makes for a beautiful masterpiece!
A simple Christmas magnet to make with your kids. The kids loved painting and decorating their own trees to hang on the fridge. My son's is still hanging there from 2 years ago:)  Things needed: Popsicle sticks, paint, glitter, glue, self stick shapes and a strip of magnent for the back.